| About this platform | |
|---|---|
| ID | OSW8bccb1f0123f47d1831a1348ecbe63cc |
| UUID | 8bccb1f0-123f-47d1-831a-1348ecbe63cc |
| Label | About this platform |
| Machine compatible name | AboutThisPlatform |
| Statements (outgoing) | |
| Statements (incoming) | |
|
|
|
Description
No description found
| Item | |
|---|---|
| Type(s)/Category(s) | Tutorial |
| Creative Work |
|---|
| Article |
|---|
| Tutorial | |
|---|---|
| Prerequisites (required) | |
| Prerequisites (optional) | |
| Follow-up (recommended) | |
Introduction
This article is designed to help you get started using this platform and provides basic information on the underlying technology.
We recommend reading the section on Semantic technologies to gain some insight on the technology powering this platform, to get an idea of what to expect and understand unique features and behavior of this platform.
A glossary of frequently used terms can be found at the bottom of the page: Glossary
Getting started
Use this section as a reference on how to log into and work with the plaform.
Log-In
- Navigate to [1] in your browser. We recommend using Microsoft Edge.
- Click sign in below the headline or click on the person icon on the bottom left corner and then "Log in" - you will be forwarded to the "Log in" page.
- You have two options now.
- Click "Loging with your ORCID Account" to be forwarded to ORCID.
- Note: We use ORCID to provide authentication. Your ORCID has to be registered by an admin beforehand.
- You will be asked to enter ORCID or registered email and ORCID password.
- Click "Sign in".
- You will be redirected back to the Battery Knowledge Base platform.
- Enter username and password that has been sent via email.
- Note: This account has been created manually with a default password. Please set a new one after login.
- Click "Log in"
- Click "Loging with your ORCID Account" to be forwarded to ORCID.
- You will be redirected to the main page.
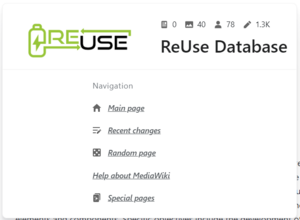
Here are some basic elements that you will find on most (content) pages within the wiki. Content pages are very similar to the article pages you might be familiar with from classic Wikipedia and represent knowledge elements. Other pages are for example spe, like the account preferences pages.

The elements in the screenshot are:
- Title of the page
- Text body of the page - Contains headings of different order, can hold images and functional elements, like input fields (the QR code reader) and tiles.
- Miniature logo - Redirects you to the main page.
- Search - Opens a popup for the full text search at the top center of the page.
- Navigation menu - "burger menu" - Opens a popup that leads you to special pages, recent changes and more.
- Visual editor - Enters the visual editor, which allows editing of the page content, like MS Word.
- Source code editor - Enters the source code editor, which allows editing the source of the page - advanced feature for admins!
- Discussion - Leads to a separate discussion page for the page you are on, which can be used to discuss the content in a forum style way.
- Three points menu - Opens a popup with page functions and tools like:
- Delete - Deletes the page.
- Move - Allows to move the content of the page to another address.
- Protect - Protects the page from unwanted edits.
- Watch / Unwatch - will place/remove the page on your watch list. You are notified when the page is altered.
- Print / Export PDF
- Edit slots - Another editor for each of the hidden slots of the page, which are used to store further information on the page - advanced feature for admins!
- View history - Leads to a separate page with the version history of the page, which can be used to go back to a version or compare changes.
- Refresh - Important: Your go-to if something seems odd. Rebuilds the page.
- Copy - Create a copy of this page. It will have the same content, a new title which you specify, and another address. Useful, when you want to create similar items or pages.
- Tools ... - See for yourself. Here you can explore the information which is store on and within the page.
- Table of contents - Helps to navigate the page and gives an overview of its contents.
- Wiki preferences (personal) - Allows setting theme, Font size, page width and line height for your user on all pages to your liking.
- Your Alerts - A preview of your alert notifications, allows to set preferences thereof and navigate to "All notifications".
- Your Notices - Another kind of notification, allows to set preferences thereof and navigate to "All notifications".
- Personal menu - Additional settings and navigation
- Click your username to navigate to your user page.
- Set language.
- Talk - Create a new discussion.
- Preferences - Set wiki preferences for your user.
- Watchlist - Opens your watchlist.
- Contributions - Shows your contributions (edits).
Navigation menu
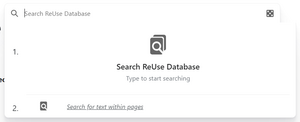
Search bar
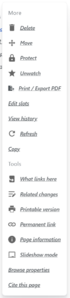
Three points menu
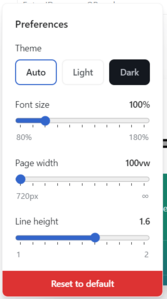
Wiki preferences
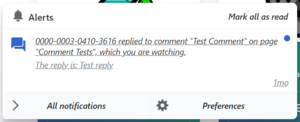
Alerts
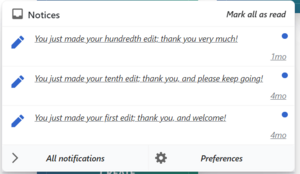
Notices
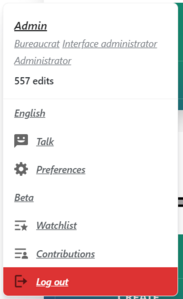
Personal menu


Elements of the main page
- QR code reader - Allows you to use your laptops or mobile devices built-in or attached camera to read a QR code. Hover over the info icon for instructions.
- Apps - Tiles for categories in the platform. A tile can be:
- A link to another page, e.g., Samples and shipments - leads you to an article providing overview of all samples and shipments.
- A category.
- The "create" button allows you to create an instance of said category.
- Clicking on the underlines title of the tile leads you to the category page. Here you can find more information on the category and an overview of the instances of said category.
- Dashboards - One dashboard for each organization. Here you can find tabular representations of shipments to / from your organization and of samples processed at or sent to / from your orgaization - as soon as they have been documented in the platform.
Types of pages
Information on categories and namespaces
Pages in Open Semantic Lab (OSL) can be hosted in different namespaces. Namespaces are indicated by the text enclosed by slash (/) and collon (:) in the URL of a page. A URL follows this structure: https://domain/wiki/Namespace:OswId.suffix
- OSL uses mainly two namespaces:
Categoryfor classes,Itemfor instances. Beside that there'sFilefor items that represent files uploaded in the system andJsonSchema, containing property definitions that are using by multiple unrelated classes. - The OSW-ID is a unique identifier that is assigned to each page on creation and is used as a mostly hidden reference for the page, while you are shown the label of the page.
- the suffix is only relevant for pages in the
Filenamespace.
The type of a Page can be identified much more easily based on the infobox on the top right as shown in the following screenshot of this page's infobox:
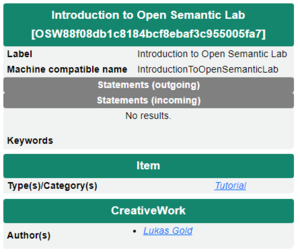
Infobox of an page of type "Article"

- Here, the "Label" of the page and the OSW-ID are displayed within the top section.
- The second section indicates whether the page is in the Namespace "Item" or "Category".
- "Item": specifies the direct category that this item is an instance of
- "Category": specifies the direct category that this category is a subcategory of
These properties can also be explored using the graph tool, which can be found under the headline "Graph" at the bottom of every page as shown in the following screenshot:
Explore hierarchy with graph tool

Category (class) pages
- You can get to a category page by clicking on one of the tiles on the main page OR
- Simply search for a category.
- Herefore, click on the search icon and enter: "Category: User" to search for the category with the name "User".
- After selecting the correct page from the list of results, you will see the following page:
Elements of the category page (part 1)
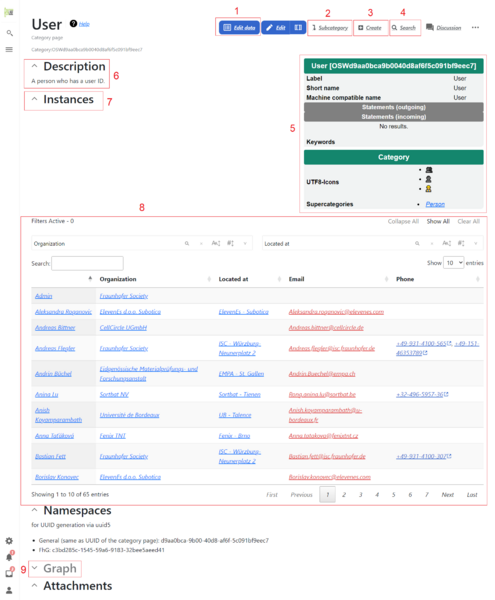
User category page , top half

Here we meet some additional page elements like:
- Edit data - Opens the form editor to edit the data (partially) displayed in the infobox and stored as JSON data.
- Subcategory - Opens the form editor to create a new subcategory of the category page you are on. The new page will be in the "Category" namespace. Here you edit the the data that will be displayed in the infobox of the new subcategory and that will be stored as JSON data. This might also affect the JSON schema of this new subcategory (depending on the schema template)
- Create - Opens the form editor to create a new instance of the category page you are on. The new page will be in the "Item" namespace. Here you edit the the data that will be displayed in the infobox of the new instance and that will be stored as JSON data.
- Search - Opens a form to apply filters while searching for instances of the category.
- Infobox - Displays the some of the information stored as JSON data. What and how it is displayed has been designed by the creator of the JSON schema of the category and higher hierarchy categories. The infobox has a section for each of the parent categories of the category.
- Description - A header line that is always present. This is a collapsible section, as indicated by the ^ next to the text. Description diplays what has been entered through the form editor als (language specific) description, which is stored in the JSON data of the category.
- Instances - An example for a header line, creates a collapsible section.
- Content of this section, here a filterable datatable.
- Graph - An expandable section for the graph tool, which can be used to explore the knowledge graph as shown above and in the image gallery below.
Remark: More details on the Form editor can be found below.
Elements of the category page (part 2)
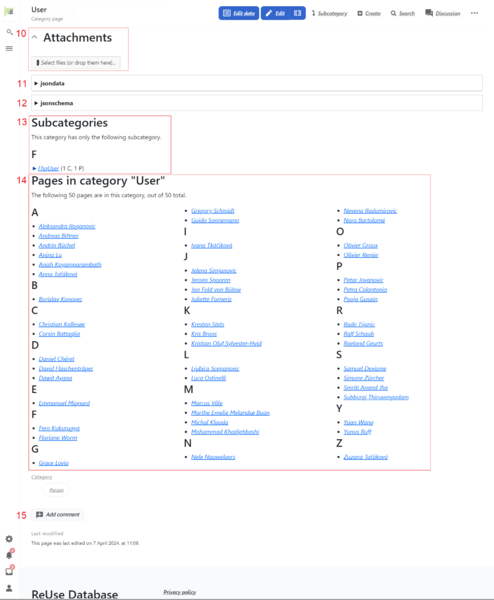
User category page, bottom half

10. Attachments - Another standard section (like Description) that hosts a button to either drag and drop or open a file dialogue to upload one or more files as attachment. After uploading, the page you are on, will be reloaded and will list the file as attachment. For this file, the page you were on will be set as creation context.
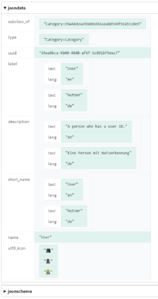
11. jsondata - This field can be expanded to show the JSON data stored on this page. JSON data is used to store the information. An example is shown in the image gallery below.
12. jsonschema - This field can be expanded to show the JSON schema stored on this page. This JSON schema determines the data structure of instances of the category. The JSON data of instances is validated against this schema and the form editor for instances (available through the "Create" button) is constructed from it aswell.
13. Subcategories - A section that provides a list of subcategories.
14. Pages in category "<category name>" (here: "User") - A section that provides a list pages (instances or items) in this category.
15. Add comment - A forum style comment function with an editor similar to the visual editor, available from the "Edit" button.
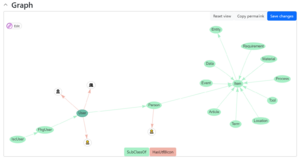
Knowledge graph of the category "User"
jsondata and jsonschema


Further reading
Search for the category "Entity". You will find the page for the fundamental category "Entity". It is used to describe all things in the platform. Either by exploring the knowledge graph in the section "Graph" (right-click nodes and toggle propertis by left-clicking to unfold links between nodes that are not displayed yet, or left-click on the link to navigate to a nodes page.) or in the section "Subcategories", you can discover which categories have been defined to describe and model knowledge in the platform.
Item (Instance) pages
- Most pages in the platform will be an "Instance" of a category, which is located in the "Item" namespace (compare above).
- You can access Item pages through:
- the text search
- the list of instances on a category page
- the "Search" button on a category page
- links in infoboxes and on all kinds of pages
- pages with overview (data)tables
Elements of the item page
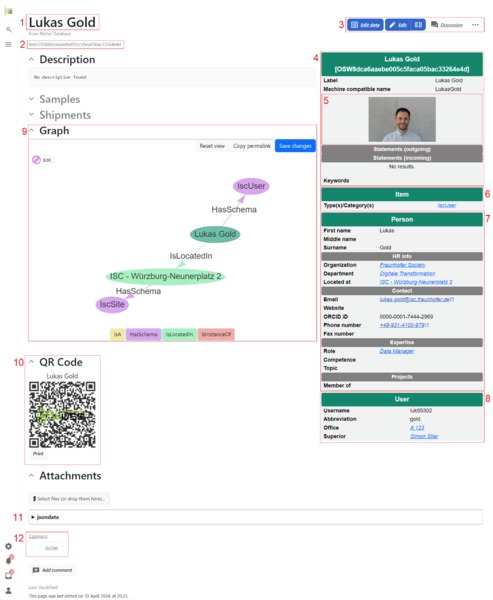
An instance of the category "IscUser"

There are only few elements, which haven't been discussed already.
- Title of the instance page.
- Full page name of the instance page.
- Reduced number of tools compared to "Category" pages as instances can't have subcategories or be instantiated.
- Info box - The heading section is inherited from "Category:Entity", displaying properties defined in the schema of "Entity".
- A render of the property "Image"
6.-8. Infobox parts inherited along the hierarchy "Entity" > "Item" > "Person" > "User" > "IscUser".
9. Expanded "Graph" section showing a link to the respective "Category" page "IscUser" by the semantic property "HasSchema" and the relation of the instance to an instance of "IscSite" via the semantic property "IsLocatedIn".
10. Expanded "QR Code" section, which is available on every instance page (which is an instance of a subcategory of "Item")
11. As an instance defines no schema only the JSON Data of the page is displayed here
12. Link to an overview of all categories (via "Category") and to the category "IscUser"
File pages
The following image gallery displays the relevant elements of a WikiFile page, which are specific to file pages.
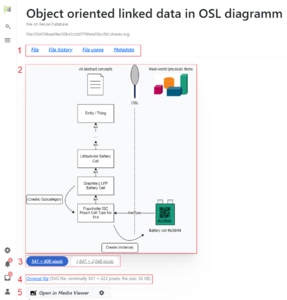
Example WikiFile page with preview of the file
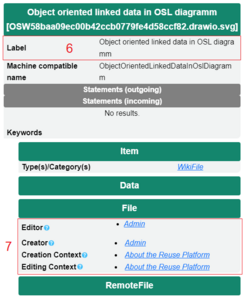
Infobox of a WikiFile page
Footer of a WikiFile page


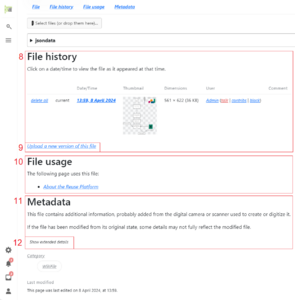
Elements of the file page
- Navigation pane to naviagte the File specific sections of this page.
- Preview of the file.
- Displaying option for the preview (for images only).
- Link to and information on the original file.
- MediaWiki file editor.
- Label given to the file.
- Information on the creation (creator and context) and editing of the file (last editor and context).
- File history - an overview of the versions of the file saved (uploaded!) to the platform.
- Upload a new version of this file - Forwards to a separate page to upload a new version, which will then be listed at the top of the history and be used instead.
- File usage - A list of pages using this file.
- Metadata - A section on the metadata available for this file, which was read from the file.
- Show extended details - Shows the metadata. For images it displays, e.g., the resolution.
Ways to interact with the structured data stored in the platform
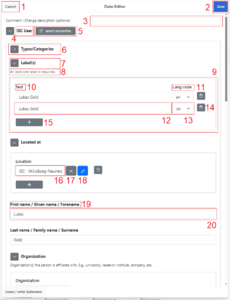
The form editor
The form editor is the central component for entering and editing structured data. The following image shows the screenshot for an instance of the category "IscUser" (hierarchy: "Entity" > "Item" > "Person" > "User" > "IscUser"):
Form editor - example: an instance of the category "IscUser"

Elements of the form editor
- Cancel - Alternatively you can press
Escon your keyboard. - Save - Saves the entered data.
- If a field contains an error, a warning will popup and ask you to go back.
- Otherwise, the changes are transfered to the server. You are asked to wait until the process is complete. A green popup will appear on the top right corner.
- On success, a new version will be listed in the page history (only if the save contained changes).
- Comment - Field to enter a commit message for the version you want to save.
- Title of the category of the instance you are editing.
- Select properties - A drop-down menu with checkboxes to select the fields you want to enter information to. Provides a search field for the title of the field / property.
- Collapsed section "Types/Categories" - Reference to the category of the instance you are editing.
- Expanded section "Label(s)" - An example for a property of type "array" and format "table", which contains rows with several columns.
- Description of the property
- Box for the array property "Label(s)"
- Column header of the first column
- Column header of the second column
- Field of the second row in the first column. This field is of type "string" - any sequence of characters is permitted with the exceptio nof quotation marks ". If you need to enter quotation marks, those need to be escaped like this: \"
- Field of the second row in the second column
- Delete row - Button for the second row.
- Add row.
- Field of type "string", format "autocomplete" - Here a sequence of characters can be entered to search for already existing entries in the platform. Remark: Please read Important usage instructions below!
- The category/categories (here: Location) from which instances can be selected are predefined in the schema of the category (here: IscUser).
- A drop-down menu with a limited number of results will be shown.
- Note: "Located at" is a property of type "array" with just one column "First name / Given name / ..."
- Clear - Resets the input of the field.
- Inline Edit / Inline Create - Allows editing the selected entry or creating a new entry (an instance of the predefined category).
- Title of the property
- Note: The property "First name / Given name / ..." is of type "string"
- As this property is not nested inside a property of type "array" its placed at the same hierarchy as "Types/Categories", "Label(s)", and "Located at".
- Input field of the property "First name / Given name / ..."
Important usage instructions
Some (primary) autocomplete fields have an effect on other (secondary) fields. For example the primary field "Sender organization" in "SampleShipment" applies a filter to the fields "Sender site" and "Sender contact" and thereby restricts the allowed entries to those that are related to the "Sender organization". For this filter to apply and for you to be able to select values in the secondary field, you need to click a non-active (passive) area within the form editor, thereby deselecting, after entering a value in the primary field. The following image has this passive area marked in light yellow.
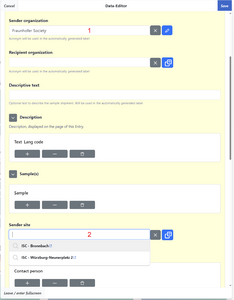
After selecting a value in a primary field, here "Sender organization", click at a passive area inside the form editor to deselect the primary field and apply filters to secondary field.

Further reading
JSON Schema provides a number of types and (string) formats, which are used within the Form Editor.
The graph tool
...
Background information
Semantic technology
The semantic technology has evolved in parallel to other web technologies and even has been proposed alongside the world wide web by Tim Berners-Lee in the 1990s. Semantics add meaning to the interconnection of information, thereby providing context and enabling humans and machines to understand and process information.
Most important semantic annotation of information allows to (re-)find information, deduce the context, assign meaning and thereby reuse the information - a particularly important feature with a rapidly growing amount of data in science and everywhere else.
We are convinced that semantic technology alongside open-source software is key to make research data FAIR Data, contributing to the sustainable transition.
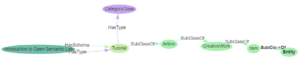
Semantic triples
The semantic triple is the basic building block of semantic technology. It links two nodes ("Subject" and "Object") by a "Property" (sometimes called "Predicate"), which expresses the relation between the two, giving meaning to the link.
empty app.diagrams.net chart
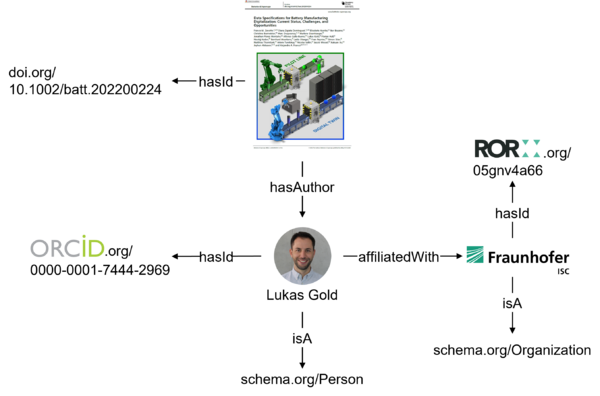
An example for a network of semantic links, describing a publication, one of the authors and his affiliate

Ontologies
Ontologies aren't just vocabularies that define terms linke a dictionary would do. Ontologies structure knowledge by defining concepts and the relations among them. Often, they involve a hierarchy, which springs from a very generic object, aiming to describe almost everything, like "Thing" in Schema.org or "Entity" within this platform. Use the > Symbol to expand different hierarchy levels and to explore the structure.
There are many ontologies in use and even more in development. Most scientific domains have their own, often multiples. Here are some prominent examples:
Object Orientation
Object Orientation (OO) is a theoretical concept in computer science. It uses the abstract concept of objects to describe and model real-world objects.
Basic building blocks
- Object
- Basic unit of OO
- Used to modell anything <=> everything is an object
- Has a Type
- Has an ID
- Class / Category
- Defines properties that are common to all instances of that class
- Structures properties into one abstract concept to make them reusable
- Type: Object
- User-defined data type
- Sorted into a hierarchy by "SubClassOf" or "IsA" properties
- Uses inheritance to get properties from more general categories by following "SubClassOf" up the hierarchy
- Instance / Item
- Actually posses the properties defined in a category
- Type: <Some Category>
- Properties from its class
- Properties from super class(es) of <Some Category>
- Finally class object are shapes to describe the actual item objects
empty app.diagrams.net chart
Linked Data
Object oriented linked data (OO-LD) in Open Semantic Lab is our way to leverage the functionality of linked data while employing concepts of object orientation to avoid the redundant definition of (semantic) properties of objects and mapping of semantic properties to ontologies.
The following figure sketches how Open Semantic Lab is used to modell objects in the real-world. On the left we see a hierarchy of abstract concepts, starting from the most generic at the top and ending up at the most specific at the bottom. At each level either new properties are introduced or the range of property values is reduced to a certain set to account for the specifics of a category. A category or class is used to define and bundle all properties or attributes that items or instances of a certain class have in common.
empty app.diagrams.net chart
Glossary of frequently used terms
- Category: basic building block that defines and structures properties that items have in common and gathers them in one abstract concept to make their definition reusable
- Class = Category
- Item: something that actually possess the properties defined in a category
- Instance = Item
- HasType: indicates the class that an item is an instance of. This describes that the item follows a schema, which is defined in that class. In OSL it points from an Item to a category
- HasSchema = hasType
- IsA: indicates that a class is a subclass of another class. In OSL it points from a category to another (more general) category
- SubClassOf = IsA
Tutorial Graph
Graph
QR Code
Attachments
jsondata
| type |
| |||||||||||||||||||||
|---|---|---|---|---|---|---|---|---|---|---|---|---|---|---|---|---|---|---|---|---|---|---|
| uuid | "8bccb1f0-123f-47d1-831a-1348ecbe63cc" | |||||||||||||||||||||
| label |
| |||||||||||||||||||||
| name | "AboutThisPlatform" | |||||||||||||||||||||
| attachments |
| |||||||||||||||||||||
| required_predecessor |
| |||||||||||||||||||||
| optional_predecessor |
| |||||||||||||||||||||
| recommended_successor |
|